Instagram Threads API - Part 2 - Creating Post using REST Apis
Part 2 of posting to Instagram Threads with the API: getting a long-lived token and publishing text, image and link posts with the Threads endpoints.
Hey there, welcome back to our journey in supercharging your Thread Account! In our last chat, we talked about getting your hands on that special API access token tailor-made for creating posts on your Threads account. Now, armed with that token, let’s dive into the fun part – crafting and scheduling posts using REST APIs.
TLDR Please visit https://github.com/lamplitlabs/ferret/blob/main/pkg/external/thread.go for golang code.
Why REST APIs, You Ask?
Alright, so let’s break it down. REST APIs are like the magic wand for tech folks. They let you talk to all sorts of web services, and in our case, Thread’s API is the one we’re interested in. By tapping into these APIs, you can weave Threads right into your existing tools and workflows. It’s like having a social media genie at your command, ready to whip up posts whenever you need them!
Prerequisites
Before you start, make sure you have:
- A Threads account that is connected to an Instagram professional account.
- A Meta app with the Threads API use case added and the
threads_basicandthreads_content_publishpermissions. - A long-lived user access token and your Threads user id, both generated by following part 1.
- A publicly reachable
https://URL for any image or video you want to attach (Threads downloads the media from that URL; local paths and private hosts will not work).
All the requests below go to https://graph.threads.net/v1.0/ and send the token in the access_token query parameter.
How publishing works on Threads
Unlike the Facebook Page API, where a single POST /feed call publishes a post, Threads uses a two-step flow:
- Create a media container with
POST /{USER_ID}/threads. This validates the post (and, for media posts, downloads the image or video) and returns a containerid. Nothing is visible on your profile yet. - Publish the container with
POST /{USER_ID}/threads_publish?creation_id={CONTAINER_ID}. This turns the container into a real post and returns the Threads postid.
Keep that in mind: if you only ever call step 1, your “posts” will never show up.
Step 1: Create a Text Post
- Url:
https://graph.threads.net/v1.0/[USER_ID]/threads?media_type=TEXT&text=[CONTENT_TEXT]&access_token=[ACCESS_TOKEN]- Method: POST
- Parameters:
- media_type must be
TEXT - text the body of the post (URL-encode it; max 500 characters)
- link_attachment (optional) an
https://URL to show as a link preview card under the text - reply_control (optional)
everyone(default),accounts_you_followormentioned_only
- media_type must be
Example Request
1
2
3
4
5
curl -X POST "https://graph.threads.net/v1.0/[USER_ID]/threads" \
  -d "media_type=TEXT" \
  -d "text=Hello from the Threads API" \
  -d "link_attachment=https://blogs.lamplitlabs.com/posts/odata/" \
  -d "access_token=[ACCESS_TOKEN]"
- Response Example of a successful response
1
2
3
{
  "id": "17889455560051444"
}
The
idis the container id. Save it, you need it for the publish call.
- When you create a post, it will not be published until you hit the publish API below.
Step 1 (alternative): Create an Image or Video Post
The call is the same endpoint; only the parameters change.
- Url:
https://graph.threads.net/v1.0/[USER_ID]/threads?media_type=IMAGE&image_url=[IMAGE_URL]&text=[CONTENT_TEXT]&access_token=[ACCESS_TOKEN]- Method: POST
- Parameters:
- media_type
IMAGEorVIDEO - image_url public
https://URL of a JPEG or PNG (required forIMAGE) - video_url public
https://URL of an MP4 or MOV (required forVIDEO) - text (optional) caption for the post
- alt_text (optional) accessibility text for the image or video
- media_type
Example Request
1
2
3
4
5
curl -X POST "https://graph.threads.net/v1.0/[USER_ID]/threads" \
  -d "media_type=IMAGE" \
  -d "image_url=https://blogs.lamplitlabs.com/assets/img/headers/automation/thread-api-part2.webp" \
  -d "text=Posted with the Threads API" \
  -d "access_token=[ACCESS_TOKEN]"
- Response
1
2
3
{
  "id": "17889455560051444"
}
- Important: for image and video posts the container is created immediately, but Threads downloads and processes the media in the background. Meta recommends waiting around 30 seconds before publishing, or polling the container status (next step). Publishing too early returns an error like
Media ID is not available.
Step 2 (optional): Check the Container Status
Use this before publishing media posts, or when a publish call fails.
- Url:
https://graph.threads.net/v1.0/[CONTAINER_ID]?fields=status,error_message&access_token=[ACCESS_TOKEN]- Method: GET
- Response
1
2
3
4
{
  "status": "FINISHED",
  "id": "17889455560051444"
}
statusis one of:- IN_PROGRESS - still downloading/processing the media, wait and poll again
- FINISHED - ready to publish
- ERROR - something went wrong;
error_messagetells you what (bad URL, unsupported format, media too large, …) - EXPIRED - the container was never published within 24 hours and has been discarded
- PUBLISHED - already published
Step 3: Publish the Post
- Url:
https://graph.threads.net/v1.0/[USER_ID]/threads_publish?creation_id=[CONTAINER_ID_FROM_STEP_1]&access_token=[ACCESS_TOKEN]- Method: POST
Example Request
1
2
3
curl -X POST "https://graph.threads.net/v1.0/[USER_ID]/threads_publish" \
  -d "creation_id=17889455560051444" \
  -d "access_token=[ACCESS_TOKEN]"
- Response Example of a successful response
1
2
3
{
  "id": "17920251442154329"
}
This
idis the Threads media id of the published post - a different value from the container id.
Result on your profile
The post appears on your Threads profile immediately: the
textas the body, the image or video (if any) below it, and thelink_attachmentrendered as a preview card. You can read it back withGET /{THREADS_MEDIA_ID}?fields=id,text,media_type,permalink,timestamp, and thepermalinkfield gives you the public URL to share.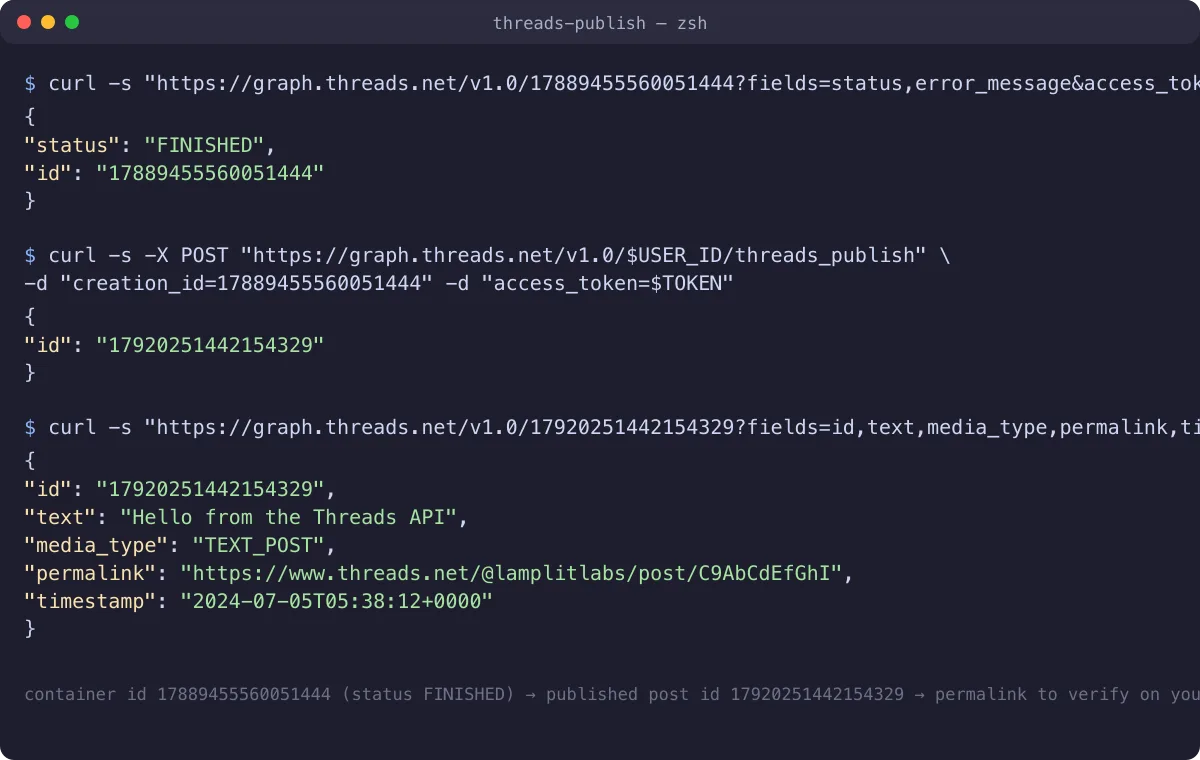 Verify your result: the container status, the publish response and the read-back of the published post. Open the
 permalinkin a browser to see the post on your profile.
Bonus: Carousel Posts
A carousel is a single post with 2 to 20 images/videos. It takes one extra round of containers:
Create one container per item with
is_carousel_item=true:1 2 3 4 5
curl -X POST "https://graph.threads.net/v1.0/[USER_ID]/threads" \ -d "media_type=IMAGE" \ -d "image_url=https://example.com/one.jpg" \ -d "is_carousel_item=true" \ -d "access_token=[ACCESS_TOKEN]"
Repeat for every item and collect the returned ids.
Create the carousel container, passing the item ids as a comma-separated
childrenlist:1 2 3 4 5
curl -X POST "https://graph.threads.net/v1.0/[USER_ID]/threads" \ -d "media_type=CAROUSEL" \ -d "children=[ITEM_ID_1],[ITEM_ID_2]" \ -d "text=Swipe through" \ -d "access_token=[ACCESS_TOKEN]"
Publish the carousel container with
threads_publishexactly as in Step 3.
Limits and Gotchas
- Rate limit: 250 published posts per 24 hours per account (check
GET /{USER_ID}/threads_publishing_limit?fields=quota_usage,configto see where you stand). - Containers expire after 24 hours if not published, so don’t create them days in advance - schedule the creation call instead of pre-creating containers.
- No native scheduling: unlike the Facebook Page API there is no
scheduled_publish_time. To schedule, run the create + publish calls from a cron job, Azure Function or similar at the desired time. - Text limit is 500 characters; longer
textfails at the create step. - Media must be public
https://URLs; signed URLs work as long as they are valid while Threads downloads them. - Token expiry: long-lived tokens last 60 days. Refresh them with
GET https://graph.threads.net/refresh_access_token?grant_type=th_refresh_token&access_token=[ACCESS_TOKEN]before they expire, otherwise every call above returns anOAuthException.
Wrapping Up
And there you have it – a crash course in creating Threads posts like a pro using REST APIs! Create a container, (wait for media to finish), publish, and read back the permalink. With these tools in your arsenal, you’re ready to take your Threads account to new heights.
Other
- I am not considering all the use cases here but you can visit https://developers.facebook.com/docs/threads for more use cases, including replies, insights and deleting posts.